The bone marrow examination is a cornerstone test in hematology for diagnosing and monitoring patients with certain blood disorders. Abundant information can be obtained from a bone marrow biopsy including morphology and cellularity of the bone marrow, changes in the normal quantities and qualities of the cellular components, molecular and other genetic testing, flow cytometry, and many other characteristics. The bone marrow biopsy is considered the gold standard diagnostic test for many of the hematologic diseases. In this post, we will describe the most important aspects of bone marrow biopsy and aspiration and how to use it in the clinical setting.
What is the Bone Marrow?
The bone marrow is a soft, gelatinous tissue found inside the bones, particularly in the long bones such as the femur and pelvis, and flat bones such as the vertebrae and others. The bone marrow is “the factory” of all the blood cells and is primarily responsible for the production of our blood cells. There are two main types of bone marrow tissue:
- Red marrow: Constitutes the active hematopoietic tissue responsible for producing the three main types of blood cells (red, white, and platelets). It contains hematopoietic stem cells (“mother cells”) that can differentiate into different types of blood cells.
- Yellow marrow: As persons age, the red marrow is gradually replaced by yellow marrow which consists mostly of fat cells. Interestingly, the yellow marrow can revert to red marrow when needed such as during severe anemia or in response to certain medications.
What is the Bone Marrow Cellularity and its Normal Values?
Bone marrow cellularity represents the proportion of cellular elements (red marrow) present in the bone marrow when compared to other components including non-cellular and fat tissue. The marrow cellularity is reported when we perform a bone marrow biopsy and can help us understand the overall integrity of the normal marrow function. The bone marrow cellularity decreases with age with red marrow transforming into yellow marrow. Although descriptions can vary slightly, here is a table that summarizes the normal marrow cellularity by age:
| Age Group | Percentage of Red Marrow | Percentage of Yellow Marrow |
|---|---|---|
| Infants | 100% | 0% |
| Children | 50-70% | 30-50% |
| Adults (<65) | 40-50% | 50-60% |
| Adults (>65) | 20-30% | 70-80% |
In clinical practice, we consider bone marrow cellularity below 30% to be decreased and above 70% to be increased. Changes in bone marrow cellularity can be seen in different conditions. Here are some examples:
| Increased Bone Marrow Cellularity | Decreased Bone Marrow Cellularity |
|---|---|
| Hemolytic anemias | Aplastic anemia and bone marrow failure syndromes |
| Recovery from bone marrow suppression | Nutritional deficiencies |
| Lymphoproliferative and myeloproliferative disorders | Aging |
| Certain inflammatory conditions such as rheumatoid arthritis | Radiation or Chemotherapy |
What are the Main Cells that Bone Marrow Produces?
The bone marrow is the factory of our blood cells and produces the three main components whites, reds, and platelets. We have described the most important aspects to learn and consider for each of these cells in our “Laboratory Assessment in Hematology” post. Please, check it up if you are interested by using the link below:
Indications for a Bone Marrow Biopsy
There are several indications for performing a bone marrow biopsy which can include but are not limited to the following:
- Diagnosis and staging of hematologic malignancies, including leukemias, lymphomas, multiple myeloma, and others.
- Evaluation of unexplained cytopenias (low blood cell counts), such as anemia, leukopenia, and thrombocytopenia
- Assessment of bone marrow involvement in metastatic cancer or solid tumors (myelophthisis)
- Investigation of unexplained splenomegaly (enlarged spleen) or hepatomegaly (enlarged liver)
- Diagnosis and classification of bone marrow failure syndromes, such as aplastic anemia and myelodysplastic syndromes
- Monitoring response to therapy in hematologic disorders, including treatment and stem cell transplantation
- Detection of infectious or inflammatory disorders affecting the bone marrow, such as tuberculosis or histoplasmosis
How to Perform a Bone Marrow Aspiration and Biopsy
A bone marrow biopsy is accomplished by the insertion of needles into the bone cavity for aspiration of the bone marrow fluid (aspirate) and a core needle biopsy (a piece of bone taken as a cone). We know! It sounds scary. However, with the proper technique and patient cooperation, a bone marrow biopsy can be a tolerable procedure that is readily available in most offices and hospital settings. There are several considerations to keep in mind when deciding the best approach to perform our procedure:
Site selection
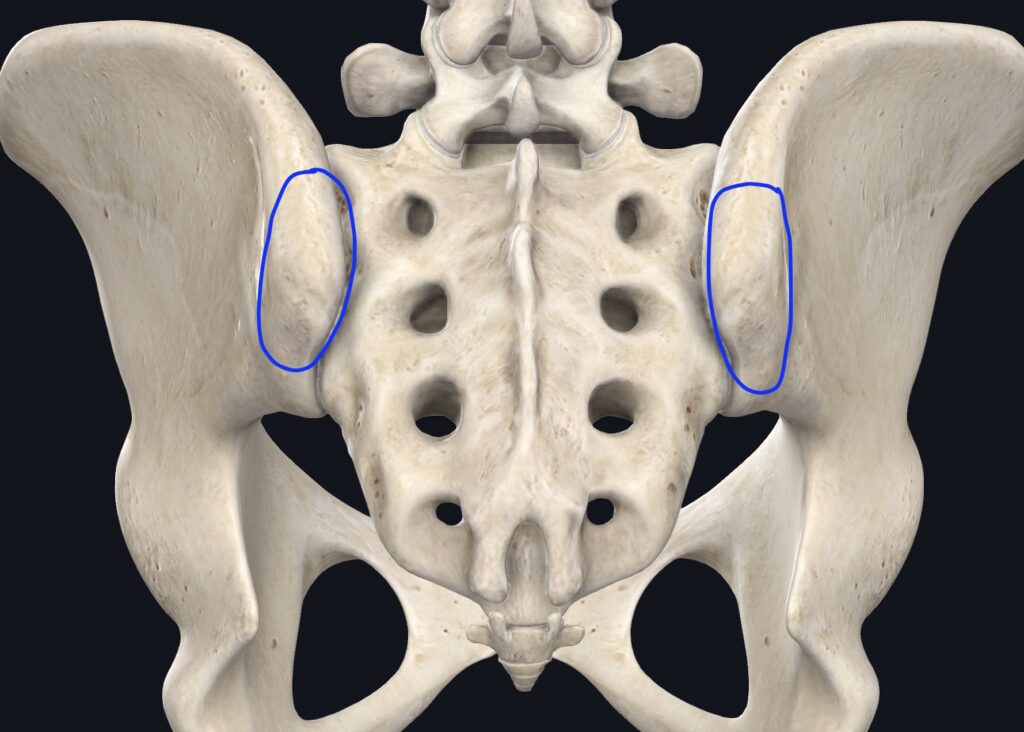
There are three main sites used for bone marrow aspiration:
- Posterior Iliac Crest: This is the safest and most easily accessible site. The posterior iliac crests (right or left) can be used with the patient in a prone or decubitus lateral position. The risk of puncture of other structures and organs is lower with proper landmark recognition. Finally, the bone density in the posterior crest is higher and becomes the highest yield site for assessment.
- Anterior Iliac Crest: The anterior iliac crest is located on the front side of the hip bone (ilium), just below the iliac crest. The site is generally easy to palpate. However, there is increased vascularity with a slightly higher risk of bleeding than the posterior iliac crest and there is potential for damage of the lateral femoral cutaneous nerve causing sensory disturbances in the affected thigh.
- Sternum (in children): The sternum (breastbone) is located in the center of the chest wall. In children, the sternum is sometimes used as a biopsy site due to the ease of accessibility and increased bone density in this area. However, the risk of injury to chest structures, particularly located behind the sternum is the main concern for this site.
Patient Position
Considering that we choose the most commonly used site (posterior iliac crest), there are two main positions a patient can be placed during the biopsy:
- Prone position: Or patient facing down, allows easy access to both posterior iliac crests and stabilization of the patient’s body against the examination bed with the help of gravity. This position can be uncomfortable to patients, particularly those with cardiopulmonary conditions as the abdominal and chest pressure in this position can make it harder for them to breathe. Some patients experience back pain in this position as well. Finally, it could be more difficult for the person performing the procedure to use wrist rotation and arm stabilization when drilling into the bone cavity as it is challenging to keep the arm close to the body. Prone is the most common position used in clinical practice (in our opinion).
- Lateral decubitus: Or the patient on the side in a fetal position, the lateral decubitus is an excellent position as well. This position is the most preferred by patients except for those with hip or shoulder injuries who may not be able to stay on their sides for longer periods. An issue that arises with this position is patient stability as patients tend to rock back and forth when the needle is pressed against the pelvic bones. Using the operator’s non-dominant hand to stabilize the tip as the dominant hand accesses the bone is usually the best way to help in this situation. Finally, patients in the lateral decubitus position in general are placed at a higher level than prone which allows the operator to keep the arms close to the body providing stability and making the twisting motions of the wrist a lot easier.
Any of the two positions are great options to perform a bone marrow biopsy. We recommend practicing both positions and determining which one is easier for the performer. Using the same technique repeatedly will make it easier to perform. However, one may need to use the other position depending on the clinical status of our patients such as when someone cannot tolerate one of the two positions. Getting familiar and comfortable with both is ideal!
Performing a Bone Marrow Biopsy
- Patient Preparation: Discuss the procedure with the patient, addressing any concerns or questions they may have. In most institutions, written informed consent must be obtained before moving with the procedure.
- Positioning: Position the patient in a suitable position, depending on the patient’s preference and the operator’s choice. Make sure that the patient is comfortable as the procedure may last longer than expected sometimes.
- Anesthesia: Administer local anesthesia (lidocaine) to numb the skin and underlying tissue at the biopsy site. This helps minimize discomfort during the procedure. Use the anesthesia needle to identify the bony structures well and numb an area of approximately 1 to 2 cm in diameter to allow a wide area to work on.
- Biopsy Site Selection: Identify the optimal site for the biopsy, typically the posterior iliac crest. With your hands, create an arch over the patient’s back by palpating the anterosuperior iliac crests with the tips of your index fingers. Your thumbs should be extended and resting along the posterior iliac crest. One can also measure three fingers above and lateral to the gluteal cleft (close to the coccyx).
- Skin Preparation: Cleanse the skin over the biopsy site with an antiseptic solution such as Chloraprep to reduce the risk of infection.
- Biopsy Needle Insertion: Make a small incision in the skin at the site where the needle will be introduced to reduce the resistance by the subcutaneous tissue when inserting the needle. Using a bone marrow aspirate or core biopsy needle, apply steady pressure with repeated wrist twisting motions (the more the better) as the needle is introduced in the bone compartment.
- Bone Marrow Aspiration: Once the biopsy needle is properly positioned within the marrow cavity (one usually feels a give or decreased resistance once inside the bone cavity), use suction to aspirate a small sample of liquid marrow into a syringe attached to the needle. Patients may experience a cramping or sharp sensation during the suction and we recommend warning the patient and having them take a deep breath as fluid is withdrawn. This is usually the most painful part of the procedure besides the anesthesia with lidocaine.
- Bone Marrow Biopsy: Using the core needle, enter the bone compartment again until there is a give or decreased resistance. Then, withdraw the inner stylet of the biopsy needle leaving the shallow core needle to advance with rotating motions to obtain a core biopsy specimen. Apply gentle traction while rotating the needle to obtain a cylindrical bone marrow core sample (usually needles have an open or close mechanism, close it before pulling out the needle by using a rotating motion as well).
- Sample Handling: Carefully remove the biopsy needle from the bone, ensuring that the core biopsy specimen remains intact. Transfer the core biopsy specimen to a suitable container for fixation and processing for evaluation by a hematopathologist.
- Post-procedure Care: Apply pressure to the biopsy until bleeding is stopped. Dress the site with a sterile dressing and provide instructions for wound care and activity restrictions. Monitor the patient for any signs of complications, such as bleeding or infection.
- Pathology Evaluation: Send the bone marrow aspirate and biopsy specimens to the pathology laboratory for analysis. Make sure all the samples are correctly labeled and contain all the relevant information required for validation and interpretation by pathology.
- Follow-up: A bone marrow biopsy can provide a preliminary report in the first 72 hours. However, most molecular and other specialized tests may take up to 10-14 days to become available. Discuss the results of the bone marrow biopsy with the patient and develop a treatment plan based on the findings.
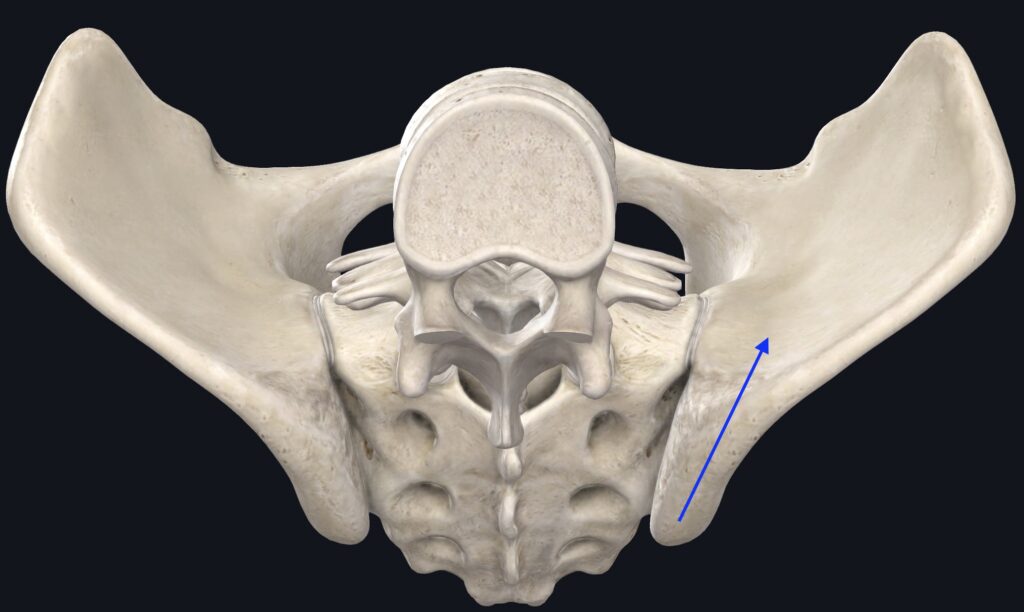
When introducing the bone marrow aspiration and core biopsy needles, one can aim towards the pubis. It is important to feel the areas with the needle tips before proceeding with their insertion into the bone to make sure the chosen site is a hard bony structure that is adequate to gather the samples. The direction of the needle in a lateral decubitus position can be aimed down in a diagonal fashion with the needle tip pointing towards the floor and feet of the patient. Here is a representation of the track that a needle should follow inside the bone for an adequate sample:
How to Assess the Quality of the Samples Obtained During a Bone Marrow Biopsy?
Bone Marrow Aspirate
A normal bone marrow aspirate should contain abundant hematopoietic cells to be analyzed and show the presence of small bone fragments (spicules) which show that an aspirate was obtained from the bone cavity. An “aspicular aspirate” typically refers to an aspirate that appears acellular or contains minimal cellular material upon visual inspection. An aspicular aspirate may provide limited or insufficient material for interpretation. Obtaining a good aspirate is particularly important when assessing hematologic malignancies such as leukemias, lymphomas, and multiple myeloma. When a sample is dilute or aspicular, it could indicate that only peripheral blood was obtained instead of bone marrow tissue. Here is an example of an adequate bone marrow aspirate:
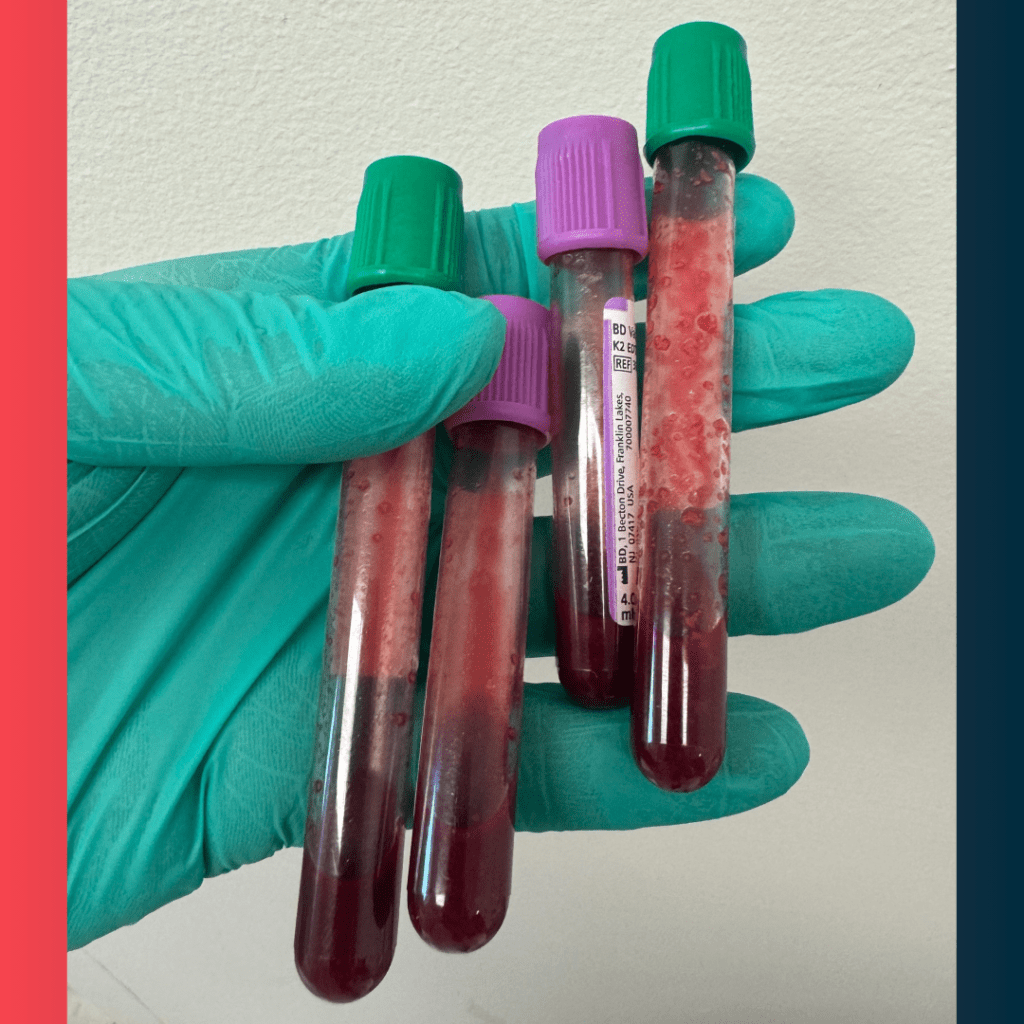
An aspicular aspirate could be obtained due to a suboptimal technique. However, other factors such as aplastic anemia, myelofibrosis (dry tap), and other technical issues during sample processing, staining, and slide preparation could also cause aspicular aspirates. Lastly, if a good aspirate could not be obtained, a touch preparation could be sent to the lab for analysis. To perform it, one can superficially and gently “touch” the bone marrow core biopsy with a microscope slide so that we can get as many cells as possible into the slide for review.
Bone Marrow Core Needle Biopsy
The core needle biopsy provides a solid sample usually a cylindrical rod. The recommended size for a core biopsy should be at least 1-3 cm. As our hematopathologists say, the more the merrier! The core is usually red to pink in color and could show one end with white cortical bone followed by red marrow material. Here is another example of an adequate core biopsy:
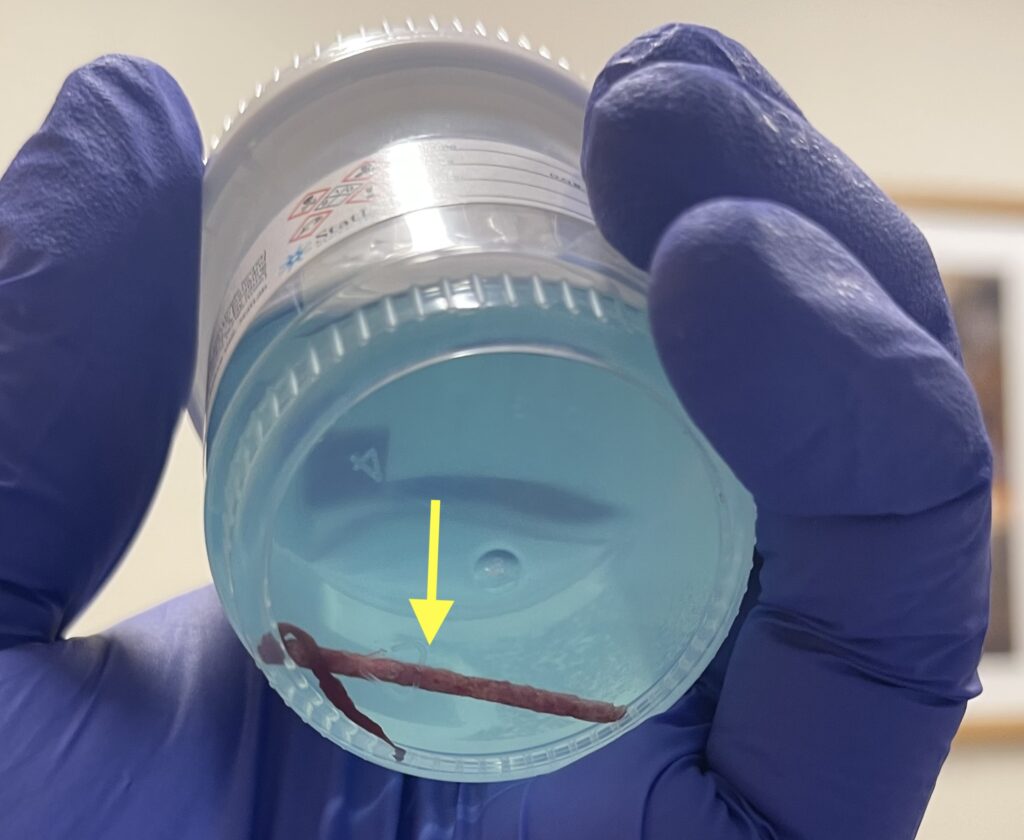
The bone marrow assessment is crucial in hematology. As a hematology fellow, performing this procedure can be daunting. It is important to reach out for help from your senior peers and attendings and familiarize yourself with the required materials, steps, and other considerations. Practice does help one become more proficient in performing the test and obtaining adequate samples while causing minimal discomfort to our patients.
To finish our post, we would like to share the following video by Ecgkid Portal who describe in detail and show how a bone marrow biopsy test is performed:
We hope this post was helpful! Please, feel free to leave your comments or ask any questions below. We would truly appreciate if you could rate this post by using our star system below. Thank you for your time and attention!

